PLEASE read the complete text first, before grabbing any rings or pliers. It will help to get behind the principle, once you follow the images, to actually weave.
Please chose rings with an Aspect Ratio of around 3.0 or a bit below - in higher ARs it's more difficult, especially for beginners to learn. For this tutorial I used 16swg BA and AA rings; BA coiled on 11/64" to reach a final AR of ~2.85; the AA ones are 3/16" rings that are in the 3.1 ballpark, and used here only as twist orientation markers. If only BA is available in your chosen ring size, maybe just use two sharpies to mark the starter rings when reproducing - but you'll see soon, that you can omit that at all - as told, the colored rings are only used to show the successive chain twisting in the photos, not for marking separate ring layers.
Let's begin now: Prepare a three-ring Moebius, and note that there are two possible 'twist' orientations of this; for now you 'want' to have it in a way, that if held at the left ring, the successive rings will twist top towards you, like the cut of a standard drill bit does. Preparation of three or four preopened rings may help you to 'survive' the starting process until the pattern has stabilized; later on they won't be necessary anymore. Note: The other Moebius twist direction is also possible, to start a JPL with other twist direction, but is not shown here - this might be a valuable info for 'lefties'.

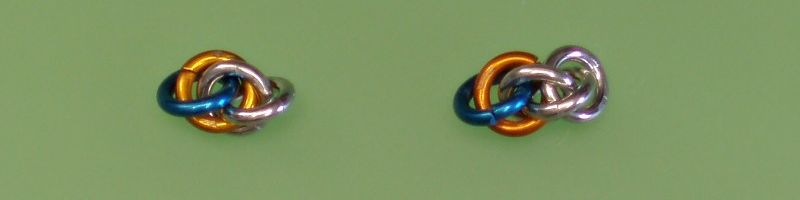
Orient this short chain segment now in a way, that the first ring (in my samples blue) is roughly horizontal, the second one (orange) a bit twisted towards you, and the third one (blank) twisted further towards you, roughly vertical - like shown as left sample of image above. Now add a further ring, horizontally through the last two rings, and layered flat above the first one, slanted 'downwards' (right sample).
Note: This making of the four-ring starter is similar to the start of a Spiral-4in1 chain, and is quasi like taking a ring, adding one, twisting the ring segment's 'top' away from you, adding a ring, twist away again and adding the fourth one. This can lead to the deceptive, and sooo straightforward seeming impression, that the top-away twist had to be continued - like it's done when weaving Spiral-4in1 from larger rings. But this is WRONG in the case of JPL! Here you must begin, to twist the chain segment from now on ALWAYS TOP TOWARDS you, else you get (with JPL sized rings) a 'locked Spiral' chain, also known as 'False Pind' - but NOT Jens Pind Linkage! Who has woven already Spiral, maybe over and over again, but always failed with JPL, might find it difficult to 'reprogram' the brain, but it's simply necessary to be successful.
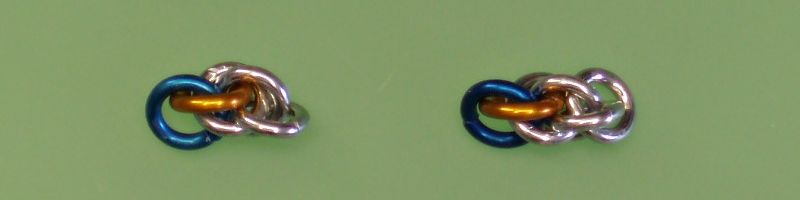
Now twist the whole chain segment top towards you, MAINTAINING the layering - be cautious NOT to lose the pattern when doing this - until ring #2 (orange) is horizontal - this is shown left. And then repeat the weaving of a new horizontal ring through the last two rings, atop the 3rd. to last one (that is now #2) - like shown at the right side.
It is MOST important here, to maintain ring #4's layering scheme 'atop' #1 - look at the photo, how the blue and its same-layer followup ring are stacked!
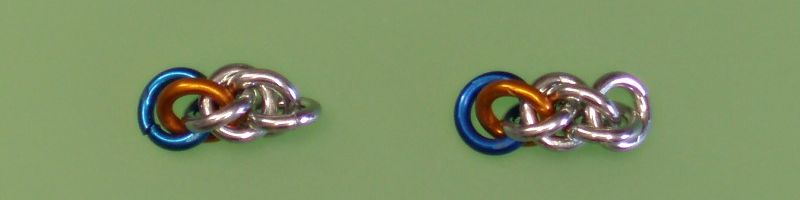
Repeat twisting top towards you, maintaining the layering, until the 3rd. to last ring is horizontal - you need yet to continue being very cautious to maintain the layering pattern. And again: Layer a new ring flat atop the horizontal one. These steps are shown in the third image. Note that the last ring of the left sample was flipped a bit 'down' when the photo was taken, but it's layered properly, nevertheless - its right neighbor sample, after adding the ring shows that.
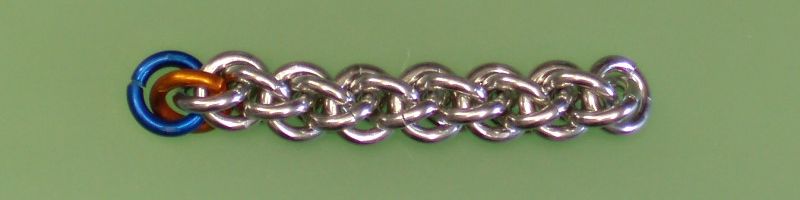
As shown in image no.4, twist again, and layer flat atop the 3rd. to last ring - as already used to. You're allowed now to breathe again - the weave starter segment has reached a point where it's stable, and successive rings' position and layering are clearly seen in the existing weave segment.
Note the similarities of image rows No.1 and No.4; they're identically oriented; see the colored orientation marker rings - and if the starter rings' colors are simply ignored, and one looks only at the last three 'active' rings, even every shown image row is identical.
So the whole process is twist and weave, twist and weave, nothing really complicated. Simply 'Rinse and Repeat', until wished chain length is reached - and just for the starting process a bit caution is needed to maintain the proper layering scheme when twisting.
Once the pattern is stable, the proper position for setting successive rings is quasi the only possible one. If you want to continue a laid-down chain, simply twist, until the 3rd. to last ring lies horizontal, sloping 'downwards' to have found the start orientation - and then continue as used to, by layering the next new ring atop it, through the last two rings, as taught above. It's nothing special, and even unimportant, at which side of the chain you add further rings - both sides are the same and behave the same.
Final notes: JPL can be woven in an AR range from around 2.7 to 3.3; the higher the AR is chosen, the more 'fluid' the weave will behave. I suggest to chose low ARs for learning, shorter pendant-like chains and bracelets, as here the denser pattern looks more orderly. And the higher ARs above three are of advantage for necklaces and wallet/key chains, as here the chain behaves more 'fluid'. Please note, that above an AR of around 3.05 continuous caution is needed, to stay 'on track' with the ring layering of the last four rings, as here rings can slip out of the proper scheme. Same is possible at open chain ends. The trick to solve this problem, is to finish open chain ends with at least two sub-AR3 rings (or three or multiples of three for a more orderly look). Thus I rate 3.05 as 'sweet spot' AR for JPL.
Tip: If such rings aren't in your stock, just use diagonal cutter and/or file to make a larger kerf in some of your JPL rings, and bend the gap closed - in result getting the couple of needed lower-AR rings. A slight ring deformation is usually acceptable, and with a bit caution these rings aren't overly mangled by this. Or buy them from me... ;)
As usual: Have fun! -ZiLi-