As I was asked to show more, I explored the matters of Goldberg polyhedra a bit further - while in the previous article a Goldberg (2,1) polyhedron emerged, and that one was yet woven from a dodecahedron as basis (twelve pentagonal 'flowers'), I chose this time directly the icosahedron as basis approach, that is woven from twenty triangles, to reach a Goldberg G (3,1) sphere.
And also on customer request, I explain this time the building block approach a bit more, split up in more successive steps, with photos. Who doesn't need them, may scroll over these steps, but there will be surely the one or other who appreciates having them as photo...

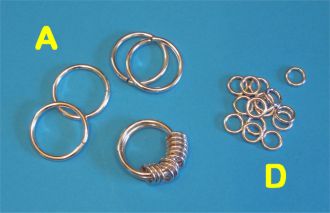
First, get and prepare your rings. I calculated (and tested) a couple of combinations of four ring types for this body. In this tutorial I show the creation of the most perfect sphere I achieved yet. There are some smaller and larger ring combinations around, but they are either not so perfect adjusted to each other, or I could not yet acquire the proper mandrels to make the needed ring sizes. There are two large face ring types, and a smaller one for the twelve corners, plus a connector ring size. I needed two slightly different large face ring types, to be able to weave already an appropriate surface bend into the triangles.
Ring data chosen here are (nominal mandrel sizes; final data differ)
(A, top left) 12swg/2.4mm x 3/4" for the larger face rings,
(B, bottom right) 12swg/2.4mm x 18.0mm for the slightly smaller face rings,
(C, top right) 12swg/2.4mm x 15/32" for the icosahedron corners,
(D, bottom left) 16swg/1.6mm x 15/64" for the connector rings.
As people tend to miss this info just too often, now printed bold: If you get ring kits from ZiLi Maille or a reseller, the ring kits are calculated for paired-ring connectors, if you decide to weave size XXS, XS, C or S, while size M, L, and XL are calculated for tripled connectors, as shown in this tutorial (that uses the 'L' rings).
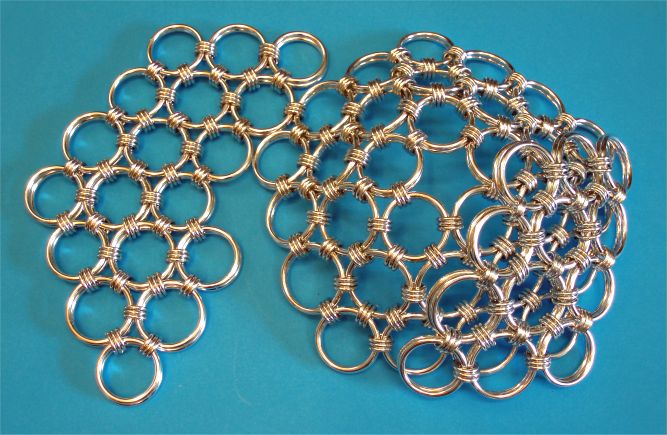
But now let's begin to weave - and start with the boring part - preclosing of quite a bunch of connector rings. As this sphere consists of twenty triangles, and each one of them can be made using preclosed connector rings alone (that enhances quality), we need a total of 540 preclosed rings, as each basis triangle has 27 connector rings. On spheroid variants with only paired connectors this number is lower, as here 'only' 18 connectors per triangle are needed, and so only 360 preclosed connector rings are needed. Further down, I'll note the paired-ring variants' ring numbers in brackets after the tutorial's tripled-ring variant ones, if a particular number of rings is asked for. And following the building block approach, we lay the corner rings (C) far aside, as they're needed far later, near the end of the project - and also the smaller face rings (B) can remain a moment in storage, as we build the twenty triangle cores first.

As shown in the images, first grab twelve (8) preclosed connector (D) rings with a large (A) ring, and then double the large one up with a parallel one. Thereafter weave a large ring through three (2) of the connectors, and add nine (6) new connectors to that one before closing - and double this large ring up as well.
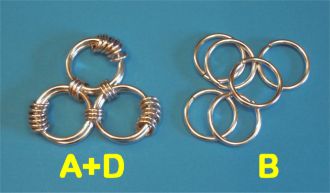

Take the fifth large ring, go through three (2) connector rings of the already existing figure-eight ring goup's two large rings each, and add six (4) further connectors - and double up. Now we have the core, and I recommend to make now twenty of these elements, before opening the bag with (B) rings. In case you build a sphere variant that has paired-only connectors, we have the connector-ring addon pattern of 8-6-4 and not 12-9-6, of course - as already noted in brackets... The (B) rings are then simply added without further connectors as corner rings, through three (2) previously existing free connectors of every neighbor ring each (or two each for a paired-connector variant, of course) - and again doubled up. We have triangles with a slight convex edge curve now, due to the slightly smaller corner rings. Do NOT worry about having wiggly triangles - the sphere WILL become rigid later on.
And finally the moment has come when the real fun begins, as we can begin to build the sphere from the building blocks that were created in a near slave-labor session...
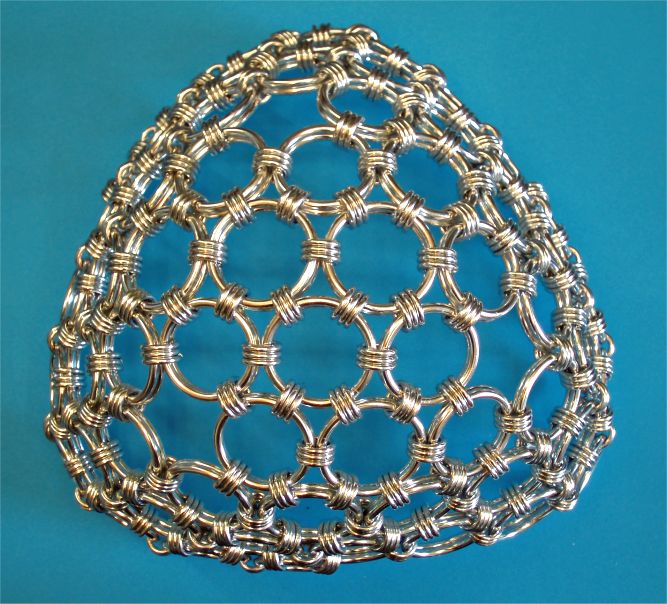
To begin with, we build a flat bowl, from five of the previously made triangles. To avoid errors, especially if you're not yet so experienced with building spheroids, connect best the larger triangle edge rings first, then the corners - and then do the sideways shift and connections and finally doubling or as shown here tripling up of connectors. The photo shows the five triangles in connection phase - the top-right triangle isn't yet shifted sideways, and the bottom-right connection not yet tripled up.
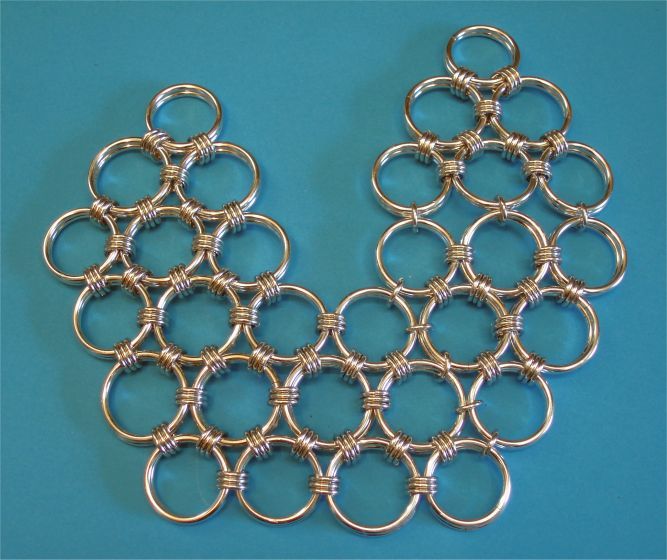
The next photo shows the finished bowl (or dome), that we build upon now, as in contrast to the first tutorial we don't build here two hemispheres, but build up successively. Please note that all is ok, if the center of the bowl shows a perfect pentagon.
Now we add successively triangles to the existing bowl shape - and often it's possible to add directly two- or three triangle blocks to the work piece. Best begin with a three-triangle one, and then a two-piece block, to add next. To verify the proper sideways shift of connected triangles use best the existing piece as alignment template - and whenever something is added, do so that perfect pentagons emerge as 'bow centers'. Maybe set even already the C rings, whenever such a pentagonal hole emerges - see the note further down this tutorial. The following photo shows addition of the first three-triangle block, as shown with large edge to large edge ring first. And it shows the verification-alignment of a further building block. If you happen to have woven the shift into the wrong direction (that happens), simply turn the piece around - bottom-up, and you have it. Just on three-triangle blocks it can happen, that some shift-connectors have to be removed and re-set, after correction.
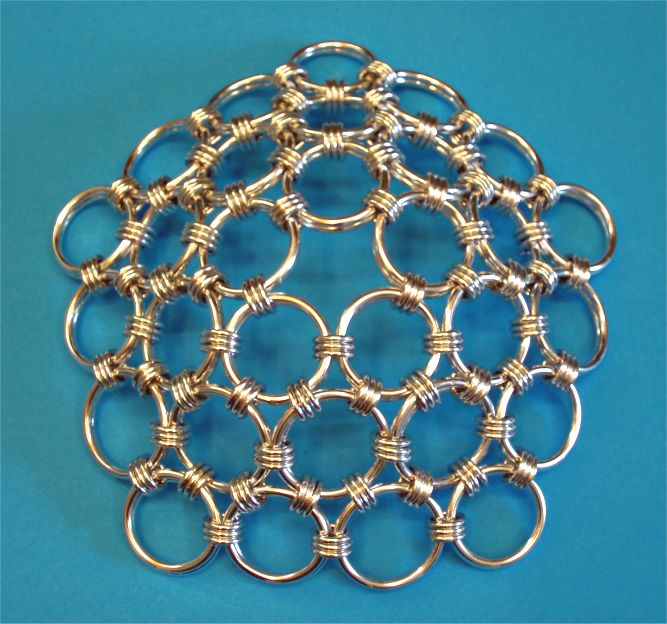
The following image shows the bowl/dome grown already to a complete hemisphere, as we're already through ten of the twenty needed triangles, after a three- and a two-triangle block is added to the five-triangle starter. Remember, that all is ok, if even looking pentagonal holes between five neighboring triangles emerge at their corner meeting points. If not, search for the alignment mistake, and correct on the spot.
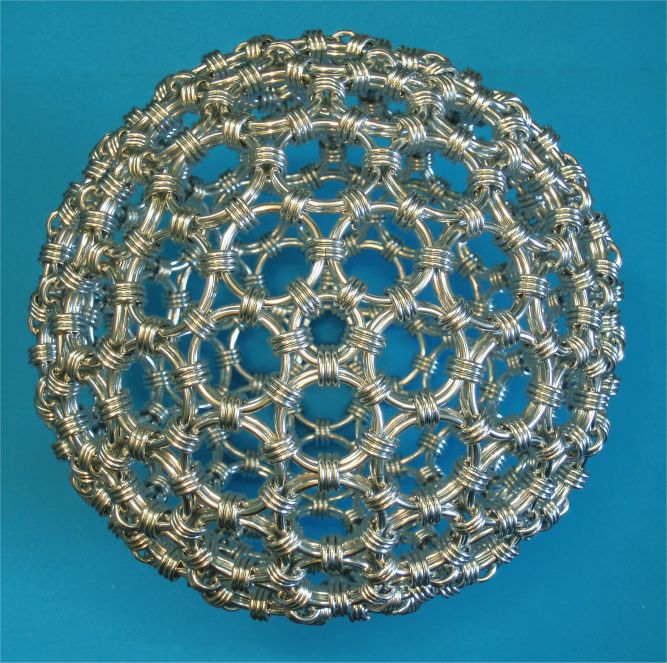
One could now produce two identical ones of these, like in the previous tutorial, but this time I recommend to use the alternate method of successively adding, to build up the sphere. This is shown in the next photo, where already all but one of the triangles are added, and just one seam has to be done before 'setting the lid on the pot'.

After connecting the last triangle an already near-perfect sphere emerged. Feel free to claim success.

But we have yet the stowed-away (C) rings remaining. These fit well into the pentagonal holes (as used to, as paired rings), and serve also to rigidize the finished sphere - it may be a bit fiddly to add them, but after near a thousand connector rings are set, these are really just the icing on the cake, and should pose not more any issue at all. One hint I can give after having woven quite 'a few' spheroids is, that some people (me included) fare better, if the C 'bud' rings are already placed while building up the bowl, as the access to the mounting spot is easier.
Have fun with your new maille ball.
-ZiLi-
P.S.: If you need ring kits of proven size combinations, or simply have further questions or proposals to make this tutorial better, ask me via FaceBook chat (Heinrich Zinndorf-Linker), or per eMail to maille@zili.de.