To Tutorial Home
Inverse Dodecahedron Filled Icosahedra
(also known as Inverted Thingamaboober - credit Nathan A.)☻
For building an 'inverse dodecahedron filled icosahedron' you need fifty large rings of a rather high aspect Ratio, and for stability, also a bit fatter wire. For samples I used 2.4mm (~12swg) Bright Aluminium rings inbetween 1/2" and 1" - the tutorial's sample is made from 2.4mm x 3/4" rings. Furtherly, the inner, inverse dodecahedron structure needs connector rings, that have an inner diameter that rings of the same WD as the large rings had at an AR in the 2.75 ballpark - for 12swg large rings' WD this were 1/4" rings - due to better optical impression, I chose 1.6mm (~16swg) x 1/4" ones at an absolute AR of around 4.2. The outer large 'face' rings need smaller connectors, as not five, but only three of the large rings run through them - for 2.4mm large rings these need to have a relative AR of around 2.2 - here 1.6mm x 13/64" at an absolute AR in the 3.4 ballpark.
Now let's start - beginning with the inner structure, that is what I call an 'inverse dodecahedron'. I chose a weaving scheme, that allows all connector rings being used as preclosed rings, so that principally also rubber rings can be used. My tutorial sample uses bright Aluminium, though. This method might need a bit thinking-ahead, as usual when weaving with preclosed rings, but it's not so bad as it sounds.
- As experience told for bright or anodized Aluminium's typical hardness, that tripled connector rings work well, take 36 of the 1.6mm x 1/4" rings, and preclose them.
- Thread six of them onto a large ring, and close it.
- Weave the next large ring through THREE of the starter ring's connectors, add three preclosed ones, and weave closed.
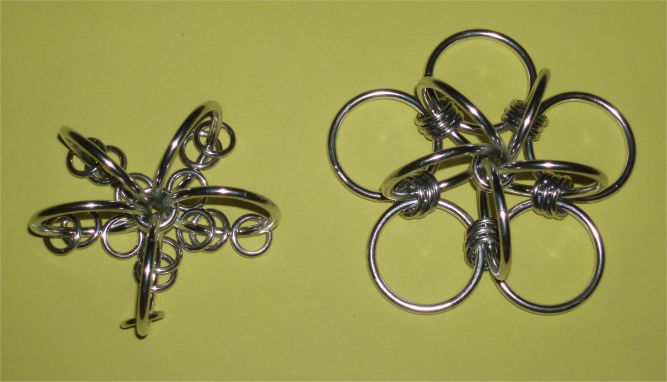
- Repeat this three further times, going always through the same connector ring sets of the first ring, until five large rings with a yet unused connector ring set are connected, in a starfish-like pattern. If even the fifth large ring went in halfways easy, so there is yet wiggle room, but it wasn't yet difficult, all is ok. If not, either work with paired connectors only if too tight (happens if your chosen material is soft, like e.g. copper - remove superfluous rings now), or add a fourth connector everywhere (harder material like e.g. steel or Titanium - and then preclose eleven further connector rings). These steps are shown in the first image, left sample.
- Next step, to repeat five times, is to weave a large ring, without adding of further connectors, through two neighboring connector ring sets of the previously made starfish, to get a pentagram-like, and yet very wiggly shape. Don't worry - that is normal. More stability will soon emerge. The result of his last step is shown in the right sample of first image.
The basic rule when making this body, is to add always new connector ring sets, if a new set large ring goes through one connector ring set only, but to omit adding new connectors, if a large ring is woven through two sets. This is, as every large ring has just two contact spots to neighboring large ones.
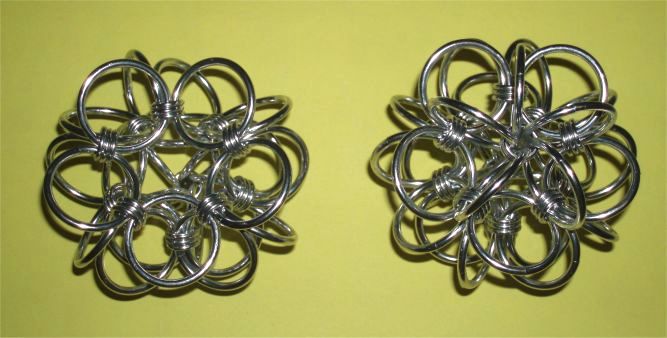
- The structure you have now, has five spots where only three large rings go through the connector sets. This is where the next large rings are added. I found it easiest, to set first one large ring only, with an added preclosed connector set, at all five 'open' spots (next image, left sample), and then add the fifth ring each, going ALSO through the connectors of the just woven neighbor spots (right).
- In result we have already more than half of the sphere woven, now, and only one set of preclosed connectors should remain, while we have yet ten large rings remaining.

- The next step is connecting five times the neighboring 'upper' free connector sets, so that now four, and not only two large rings go through them. And we're on the home stretch!
- Weave the first of the remaining five large rings through one of these, and add the last connector set, before closing. The last four large rings are then simply placed at the only spots where they can fit.
The inner 'inverse dodecahedron' structure is done now - and some people may elect to stop here, and declare success.
But we can also continue, and turn it into an icosahedron with flat lying outer 'face' rings. But before you do that, have a look at the connections. You'll notice that the five large rings tend to run in a swirl-like pattern through the connectors. It's of advantage to check, and eventually to adjust the swirl pattern, until all twelve swirls run in either clockwise or counterclockwise direction.
- For adding the icosahedron face rings, I chose to teach another way - not more using preclosed connectors and weave with the large rings, but now the other way, by using preclosed large, and to weave with small rings. So preclose twenty of the large rings, and take now the 1.6mm x 13/64" rings, after having stowed the 1.6mm x 1/4" ones away (if you didn't already).
- You see, that the outer edges of the body's large rings show a triangular pattern - and it's there, where the to be added 'face' rings are woven now atop. And experience shows, that we do this best with single-ring connections first, to set all face rings, before we double or triple them up.
- So open a connector, grab a preclosed large ring, weave around an edge ring of the basis body, and add a further preclosed face ring. Again, don't worry, that all wiggles around, now. Repeat taking an opened connector, through the just set face ring, around the next edge base ring, and add a further face ring.
- Now it becomes a 'rinse and repeat' affair, of adding connector and further face rings - the latter of course only if its spot isn't already populated. I recommend to check the base body swirl pattern everytimes, before closing the fifth connector around a swirl, and eventually correct it, as it's locked once that connector is closed. [You may notice, that I wove my two samples for this tutorial with different swirl direction. In any case, let the swirl direction be everywhere at your ball the same - either left- or right-handed, but not mixed!]

Somewhen you'll have reached the point, when all free spots of the basis body are covered, all twenty face rings are used up, and all face rings are connected with three rings to the basis body each. You may have reached the end already. But experience tells, that you can often double or triple up the outside connectors now. In latter case I recommend though, to double up all connectors first, before going further to tripling. This latter step isn't shown here, sorry - I simply forgot to photograph...
HAVE FUN!
To Tutorial Home