
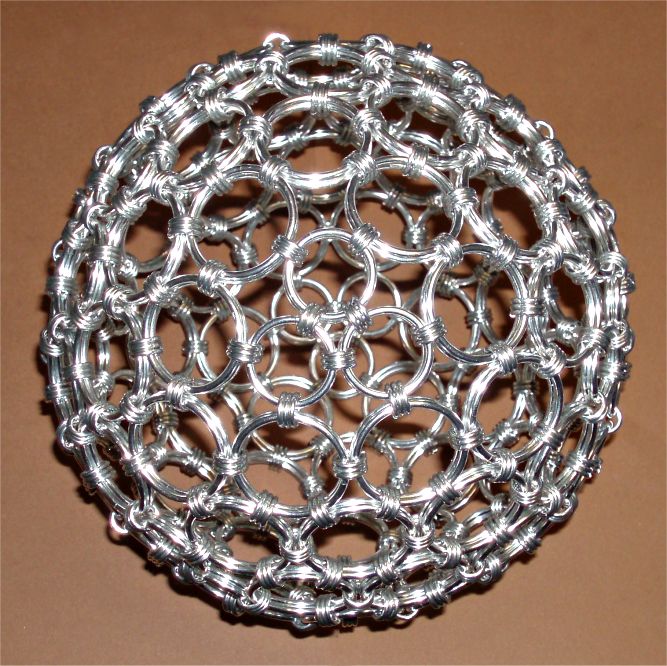
This spheroid has another basis structure as the previously published Goldberg polyhedra, that were based on dodecahedron and icosahedron. This one is based on the cube (hexaeder) and octahedron - so interpret it as a transformation/combination of these two, with convex surfaces, to become finally a sphere.
Inspired by a puzzle ball found as toy in a 'Kinder Egg', I built the basis structure from six diamond shaped surfaces, using two ring types as face rings, to reach already a convex surface shape, plus fitting connector rings - of course. After the basis shape is woven together, the eight yet open corners of that 'inflated cube' are filled with triangles woven from a third face ring type, plus the same connectors as used previously, and are basically the octahedron, that 'shines through' the cube. This all makes in total 108 ring pairs in three sizes, that build the outer surface of the sphere, plus the connectors. I won't publish the sizes publicly, but receivers of ring kits supplied by me or a reseller will find the sizes and ring amounts printed on the ring bag labels.
Let's begin - with the six diamond shaped base surfaces. These are built from their center, using the largest rings. These are ring type 'A'. As this ball type can be built with more than three quarters of the connector rings preclosed, this is a good moment to preclose at least half, better directly near three quarters of the supplied connector 'D' rings, as then the weaving of the sphere goes much smoother. As the tutorial uses ball size 'extra large' for the photos, and this ball type is woven with tripled connector rings everywhere, I tell the needed numbers for these, and note the numbers for S and XS balls in brackets.
Now the 'cores' first - do this six times, to make the basis faces.
Now it's time to open the 'B' ring bag, to surround the base diamond with the second, slightly smaller type of face rings - the remaining 'A' rings can now be stashed away - these were the reserve rings...
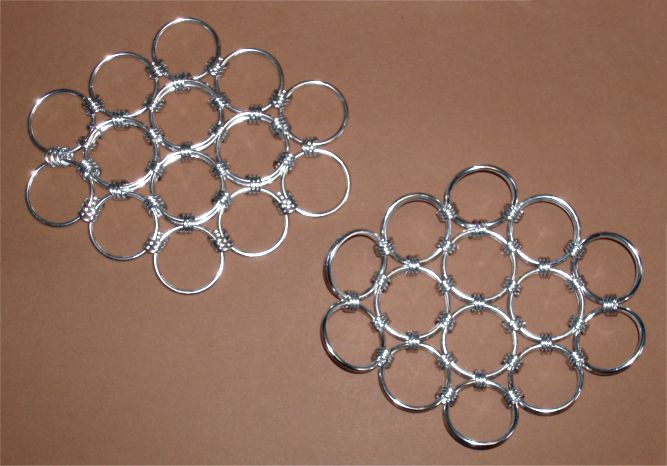
You'll note that when doing the latter, the truncated-tip diamonds dish already up into a convex shape, that goes conform with the surface of the sphere part it will turn into.
After you have finished the six truncated diamonds, it's time to sew them up. You'll surely be astonished, how fast this will go. Promised.

Finally join the ends of the strip to a ring - the photo shows this seen from top and sideways.

Using the same long edge corner to truncated-tip weaving method as before, join the remaining two diamonds to top and bottom of the ring. This will finish construction of the 'inflated cube' basis sphere.

The body is already halfways rigid by now. You may call it a day, and declare the sphere finished.
But there is more to do, if you want a really rigid sphere.
So let's break out the 'C' rings, and build eight triangular corner fillets from these, and further preclosed D connectors. The photo shows this process, and I surely don't need to explain, by now.

Last, but not least, mount these triangles into the corner holes, as shown in the final photo. It's properly done, if the transition edge will show rectangular 'holes' all-around.
Finally, you are FINISHED!
There were another possibility to set corner fillets, with alternating pentagonal and triangular edge holes - but this would need to use slightly smaller 'C' rings, that are currently not supplied, as I simply didn't calculate their needed size, yet. This may happen some when.
As usual, a last note: HAVE FUN!
First add-on: With a bit thinking-ahead, weaving of the six truncated diamonds can be a bit easier, if one follows the photo (that was shot during weaving of the L prototype). Do not weave with single rings all around, before doubling up, but set the four rings as shown in the center, add 6 (4 for the small ball type) connectors, and then double up, before setting the other core surrounding rings. You'll see soon, why I suggest this...
